Marvelous Designer
So for
this semester I choose to use Marvelous Designer for my research project. I was
originally making a caravan scene with different barrels and cloth and wood in
the scene. I could have started out by sculpting my scene in zbrush, but I
decided to use Marvelous Designer. So first I need to do research on the
subject. I got tutorials that were really good from Lynda.com that was a basic
start to marvelous designer and even an advanced course to teach you more advanced
things. So there are two ways you can start in marvelous designer. One is to
use a template of a human to start putting close on or you can import your own
model into the scene and use that. Also, you could just start with an empty
scene, but that doesn’t really help you at all. I started learn the program
with the human scene which gives you two views. One with a 3d model that you
can rotate around and pan and zoom just like in other 3d packages and the other
scene is a 2d view with a grey filled in view of your asset in a orthographic
view. I learned how to sow clothes. First you draw out a 2d plane of the clothe
that you want to make on your character by using the rectangle tool and then
you place it over your model in the 3d view and you sow the edges to make a
sleeve. You need to make clothes just how you would make them in real life. So
if you were making a t-shirt then the seams would go how they would go in real
life. You can also look up how things should be sowed on the internet and actually
find how they should be sowed. Once you know where the seams go you have to sow
it together. You can use different buttons to sow stuff, but the one I know how
to use is the segment sewing button. You basically click on one edge and then
click on another edge and it will sow them together. You can also accidentally
sow them the wrong way and it will kind of destroy your mesh, but this can be
seen in the 3d view, so you will know if you are doing it wrong. From there you
go to the 3d side of the screen which is on the left side of the screen while
2d is on the right and you click the Simulate Space button. This will allow you
to see how the cloth falls on your model and also you can start pushing and
pulling it and then you can make it look better. If you click on the cloth in
the 2d view which is on the right a properties editor will also come up on the
right and it has many settings that you can mess with to make your mesh better.
You can mess with how may polys you want or also tris and you can mess with,
elastic, thickness, pressure and a whole bunch of other settings. I messed with
elastic on my caravan so that it gave a pulling effect to my cloth. I also
messed with the thickness to give some thickness and some pressure to expand
the canopy of the caravan to feel like there was wind going through it. I also
had to use this feature called Tack on Avatar so that I could put a tack on the
cloth and basically tack it onto the wood of the canopy. I also used the edit
Tack to mess with any tacks I used that weren’t in the right spot of the mesh.
This is how I tacked the canopy to the mesh and don’t forget to simulate and
then left click on the cloth you make to pull it in the 3D view so that you can
mess with the folds and stuff like that. That is pretty much all I did for my
canopy. I’ll leave some images below of shots of things to better understand.
On the left side is the 3d view. Right side is the 2d view.
Pan is middle mouse on both 3d and 2d view. Right click rotates in only 3d
view. Scroll lets you scroll in and out in both the 3d and 2d view.

This is how you Import a model into the scene. Go to File
Import and then whatever file type listed is what you can import.

The rectangle tool is what I used to make the rectangles you
see in the images below. Also all the tools in the same palette as the
rectangle tool only mess with the 2d view while the ones on the right of the
screen mess with the 3d view.

Tack on avatar is the next tool I used and I tacked my fold
of the mesh in the 3d view to the model also in the 3d view. Image below is of
the tack on avatar feature.

If you highlight your 2d images in the right view it will
bring up settings for you to use in the bottom right. The image below shows
those settings.

From there it was just click on the 2d plane that you made
in the 3d view and kind of just move it to the spot where you want to tack
stuff and then start tacking it on to the mesh and then simulate and mess with
the settings of elasticity and other things. Elasticity can be found in the
image above and Simulate can be found in this image.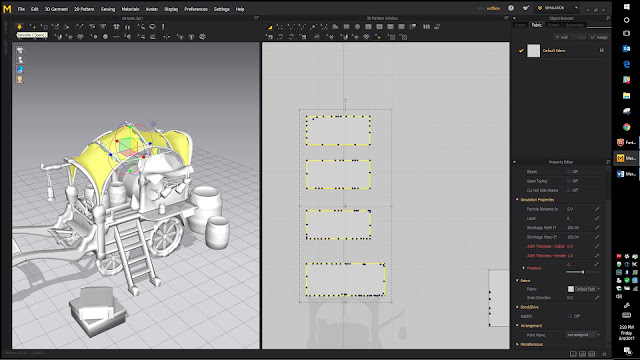

Once your done messing with the settings and you feel you
are in a good spot. Export the mesh by going to file export. Also don’t forget
to click a thickness when exporting or it will be an only one side mesh. And
these are the settings that I had for exporting.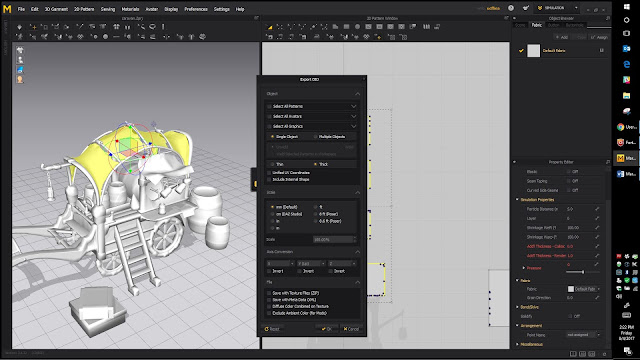

No comments:
Post a Comment