Know what you're printing and how much detail you want. FDM Printer VS. SLA Printer
SLA prints the highest level of detail at .025 microns(micrometers)
1 micron = 3.93701e-5 inches
FDM printer is better for bigger prototypes
We use the Form Labs Form 2 printers at UCF that are available to any students that are majoring in certain majors like Digital Media, Engineering(don't remember all the majors).
If you are printing small objects I would recommend that you don't hollow out the middle of the object, but you can if you want to. Its personal preference and if you do hollow out the model you will save time and cost of resin material.
The Form Labs Form 2 printer comes with its own software to check the model to make sure it is print ready. It accepts STL. and OBJ. file types. I'll have some images below of how I check the model.
Here is the Wooden Crate I made this week

Here is my process for checking my mesh in Zbrush to make sure it is print ready. I also want to say that I won't be going much into hollowing out the mesh in this post.
1. If I'm able to I try to dynamesh my mesh when I'm done with everything because that creates a water tight mesh and closes any holes that could be in the mesh and could cause issues later.
2. Next, right before I'm about to export to Preform. In Zbrush I go to Geometry>MeshIntegrity> CheckMeshIntegrity(if Mesh integrity test completed successfully skip step 3)
3. Click Fix Mesh integrity if the check failed in the last step(Image Below)

4. Now time to export the mesh. I believe that the best way to export the mesh is to export as a STL file because it doesn't store certain info that an OBJ stores. But, if you want to export as an OBJ then you have to remember to go to export in the Tool menu and uncheck Grp(Image Below)

5. If you export as STL go to Zplugin>3D Print Hub>Export to STL(Image Below)

6. You are now ready to bring your mesh into Preform if you are printing on the Form Labs Form 2 Printer.
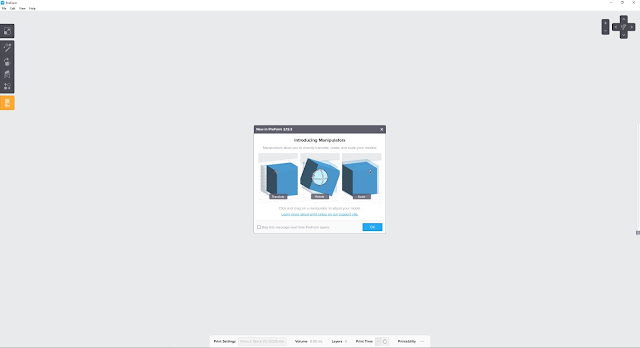
7. This is Preform when you first open it. Preform asks you what resolution you want to print at and what type of resin are you going to be using. Certain resins do not print at higher resolutions, so keep that in mind when choosing which resin is best for you. We went with a black resin, because it prints at the highest resolution of 25 microns on the form printer.You can go to File> Open> and select .stl or .obj(there are more file types, but this is what I mostly used).
8. Preform when you first open it

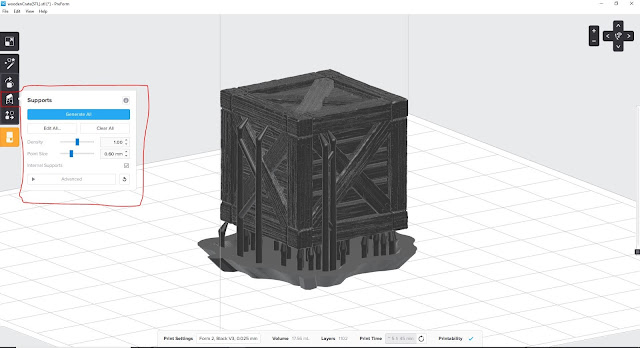
9. Once your model is in the program you want to generate some support structures so that your model isn't just being built on the build platform. If you don't have support structures, depending on what you make. It can mess up the print and waste time. Click the button in the image below to open the support structure menu and I usually just click generate all, but you can mess with the sliders to have thicker/thinner structs or to have more/less structs. Generate all works really good for us though.
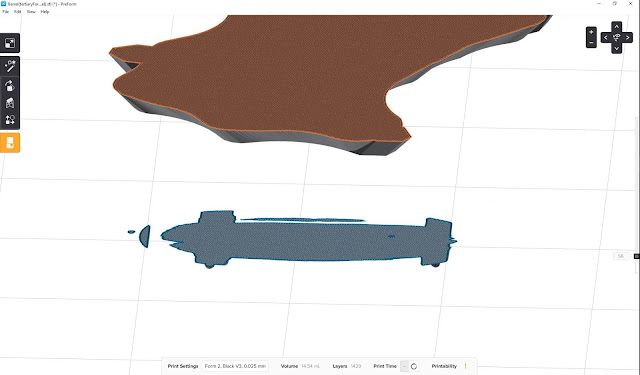
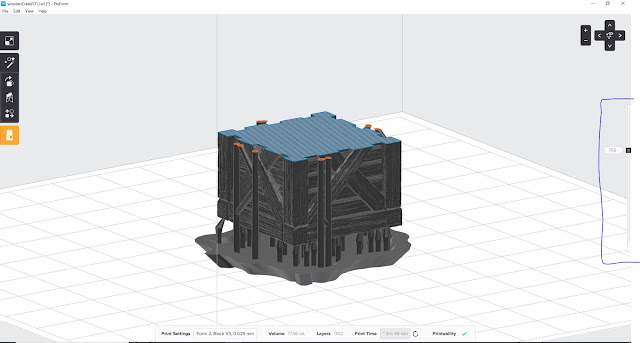
10. After generating the structs, I would scroll through the layers of the mesh to make sure that I have no islands or things that could cause the print to fail. In the first image below, I left an example of an island which is basically a piece of the print that has no support struct to it and isn't connected to the whole print, so it can break off and end up ruinning the whole print. This is a no no. The second image shows how things should look if done correctly when scrolling through the layers which is the blue outlined scroll wheel thing on the right of the screen.
. After checking to make sure all of that is fine you are now ready to print. Click the button in he 11. After checking to make sure all of that is fine you are now ready to print. Click the button in the image below and it will bring up a print menu. Find the printer you want to send it to and then just click print.

12. Once you send it to the printer a little display will pop up on the actual form labs form 2 printer with your model and some info about it. It displays how long it will print, how many layers, how much resin is used and the resolution. Hit the Print Now button and it will print after how long it says on the machine.

13. Once the print is done. I would scoop it off of the build platform and then dump it into the isopropyl alcohol to get rid of any excess resin. Make sure to wear gloves and eyewear just to be safe.

14. After that I would place it in some water just to get any more excess resin that the alcohol didn't get and then I would put it into a uv chamber or sunlight for about 10 minutes. Sometimes longer or shorter. You will know to take it out of the sun when it is no longer sticky to the touch because the resin is cured. UV chamber image below.

15. Now time for some Pre-processing. Time to cut off those support structs that you added in the Preform software. You are going to have to sand down those support structs, because they leave little nibs on your model, and you don't want that. Also if there is an small issues with the mesh you can add some Plasticine to fill those holes and sculpt back over the model. You may have to sculpt back in some detail. Once you are happy with the model though you can now move forward and get ready to make a mold so that you can cast the mold and make copies.
16. This is what I used to make the mold. Basically it was two solutions that when poured together create a chemical reaction that then hardens. First image shows the stuff that I bought that makes the silicon mold. Second Image shows the box mold that I made, and the mixing of the two chemicals. Once you are done, wait about 30 minutes depending on how much you mix and your mold should be done. Remember to pour slowly to not make air bubbles and to always wear gloves and eye wear. Also make sure to never pour this stuff down a drain or anything like that. Throw away in the trash.


17. Once you are done, pull the original model out of the mold and you now have your mold ready to go. Now it is time to pour the cast into the mold. You have to pour this pretty fast, because it hardens really quickly, but pour it as slow as you can to not make air bubbles. The image below shows what I used to make the cast. It is similar to the mold stuff, because you mix one part to the other part and it makes a chemical reaction that then solidifies.


18. Now all you have to do is sand down your cast with some sand paper and you have some really nice models. In the image below, I've started to sand down some crates and barrels.

19. And then you can make a board or use a board and play with your pieces


20. Thanks for checking out my work


21. Some final thoughts about 3D printing this semester for me to look back on(in no logical order)
21.
7. This is Preform when you first open it. Preform asks you what resolution you want to print at and what type of resin are you going to be using. Certain resins do not print at higher resolutions, so keep that in mind when choosing which resin is best for you. We went with a black resin, because it prints at the highest resolution of 25 microns on the form printer.You can go to File> Open> and select .stl or .obj(there are more file types, but this is what I mostly used).
8. Preform when you first open it


9. Once your model is in the program you want to generate some support structures so that your model isn't just being built on the build platform. If you don't have support structures, depending on what you make. It can mess up the print and waste time. Click the button in the image below to open the support structure menu and I usually just click generate all, but you can mess with the sliders to have thicker/thinner structs or to have more/less structs. Generate all works really good for us though.

10. After generating the structs, I would scroll through the layers of the mesh to make sure that I have no islands or things that could cause the print to fail. In the first image below, I left an example of an island which is basically a piece of the print that has no support struct to it and isn't connected to the whole print, so it can break off and end up ruinning the whole print. This is a no no. The second image shows how things should look if done correctly when scrolling through the layers which is the blue outlined scroll wheel thing on the right of the screen.


. After checking to make sure all of that is fine you are now ready to print. Click the button in he 11. After checking to make sure all of that is fine you are now ready to print. Click the button in the image below and it will bring up a print menu. Find the printer you want to send it to and then just click print.

12. Once you send it to the printer a little display will pop up on the actual form labs form 2 printer with your model and some info about it. It displays how long it will print, how many layers, how much resin is used and the resolution. Hit the Print Now button and it will print after how long it says on the machine.

13. Once the print is done. I would scoop it off of the build platform and then dump it into the isopropyl alcohol to get rid of any excess resin. Make sure to wear gloves and eyewear just to be safe.

14. After that I would place it in some water just to get any more excess resin that the alcohol didn't get and then I would put it into a uv chamber or sunlight for about 10 minutes. Sometimes longer or shorter. You will know to take it out of the sun when it is no longer sticky to the touch because the resin is cured. UV chamber image below.

15. Now time for some Pre-processing. Time to cut off those support structs that you added in the Preform software. You are going to have to sand down those support structs, because they leave little nibs on your model, and you don't want that. Also if there is an small issues with the mesh you can add some Plasticine to fill those holes and sculpt back over the model. You may have to sculpt back in some detail. Once you are happy with the model though you can now move forward and get ready to make a mold so that you can cast the mold and make copies.
16. This is what I used to make the mold. Basically it was two solutions that when poured together create a chemical reaction that then hardens. First image shows the stuff that I bought that makes the silicon mold. Second Image shows the box mold that I made, and the mixing of the two chemicals. Once you are done, wait about 30 minutes depending on how much you mix and your mold should be done. Remember to pour slowly to not make air bubbles and to always wear gloves and eye wear. Also make sure to never pour this stuff down a drain or anything like that. Throw away in the trash.


17. Once you are done, pull the original model out of the mold and you now have your mold ready to go. Now it is time to pour the cast into the mold. You have to pour this pretty fast, because it hardens really quickly, but pour it as slow as you can to not make air bubbles. The image below shows what I used to make the cast. It is similar to the mold stuff, because you mix one part to the other part and it makes a chemical reaction that then solidifies.


18. Now all you have to do is sand down your cast with some sand paper and you have some really nice models. In the image below, I've started to sand down some crates and barrels.

19. And then you can make a board or use a board and play with your pieces


20. Thanks for checking out my work


21. Some final thoughts about 3D printing this semester for me to look back on(in no logical order)
- Pre plan as much as you can especially if you are making a mold
- Pour everything slowly or you will have air bubbles and have to do it again(mold/cast)
- If you hollow out the mesh, make sure to always have a hole to release excess resin. Also, always have this hole facing the build platform to release excess heat that may try to form
- If you are making a big character or something that doesn't fit within the build volume of the printer then you will have to key it up with male and female keys
21.
alsdjl


